How to setup Sound Alerts for your Livestream (Ultimate Beginners Guide)

Starting out with the setup of your livestream can be challenging - especially when it comes to the configuration of the alerts for events such as subscriptions (Subs), Raids, Cheers, and various other event types. With this guide, we want to help you and simplify this process by using our tool, Sound Alerts. The best thing about it? Sound Alerts will function as an entirely free, all-in-one solution and works for all of your alerts. There is no need to install any additional software besides a broadcasting tool like OBS on your device.
With Sound Alerts, you can…
- select sounds from a massive community library
- create your own sounds with file uploads or snippets from Twitch or YouTube clips
- assemble alerts for your Subs, Raids, Cheers, Hype Trains, and Follows
- implement an interactive soundboard controlled by your community via Bits or Channel Points
- design overlays with GIFs or pre-made templates in our library
- add a variety of improvements to your alerts like text-to-speech, chat notifications, varying alert sounds for Resubs, and more
The following paragraphs will guide you through the setup process of Sound Alerts, which will take you less than 15 minutes in total.
The Sound Alerts Video Guide
Not a massive fan of a long wall of text? We got you. We assembled an easy-to-follow video tutorial showcasing every single step of the setup process for Sound Alerts. Use the YouTube chapter function to navigate yourself to your topic of choice or enjoy the complete walkthrough with screen recordings of all essential elements. Besides the general configuration procedure, it also includes some best practices for streamers and other tips and tricks within the Sound Alerts dashboard.
1. Activate Sound Alerts and implement the Browser Source
- First, you need to head over to dashboard.soundalerts.com and click on the "Login with Twitch" button
- Using your Twitch account, you then need to grant the tool access: This is necessary to read the livestream event queue of your account, manage Channel Points, and play the actual alerts on your livestream (Sound Alerts will not be using your data in any harmful or dangerous way)
- After that, you will see the Sound Alerts dashboard and the setup section as you log in
- Select the broadcast software you are using (e.g., OBS, Stream Labs, XSplit, Twitch Studio, or Lightstream) and follow the listed instructions to implement your browser source

In this example, we will click on OBS studio to highlight the steps needed to implement your browser source. After clicking the "I use OBS Studio" button, choose between a drag-and-drop implementation or a simple copy and paste method. We will use the copy and paste method for this example.
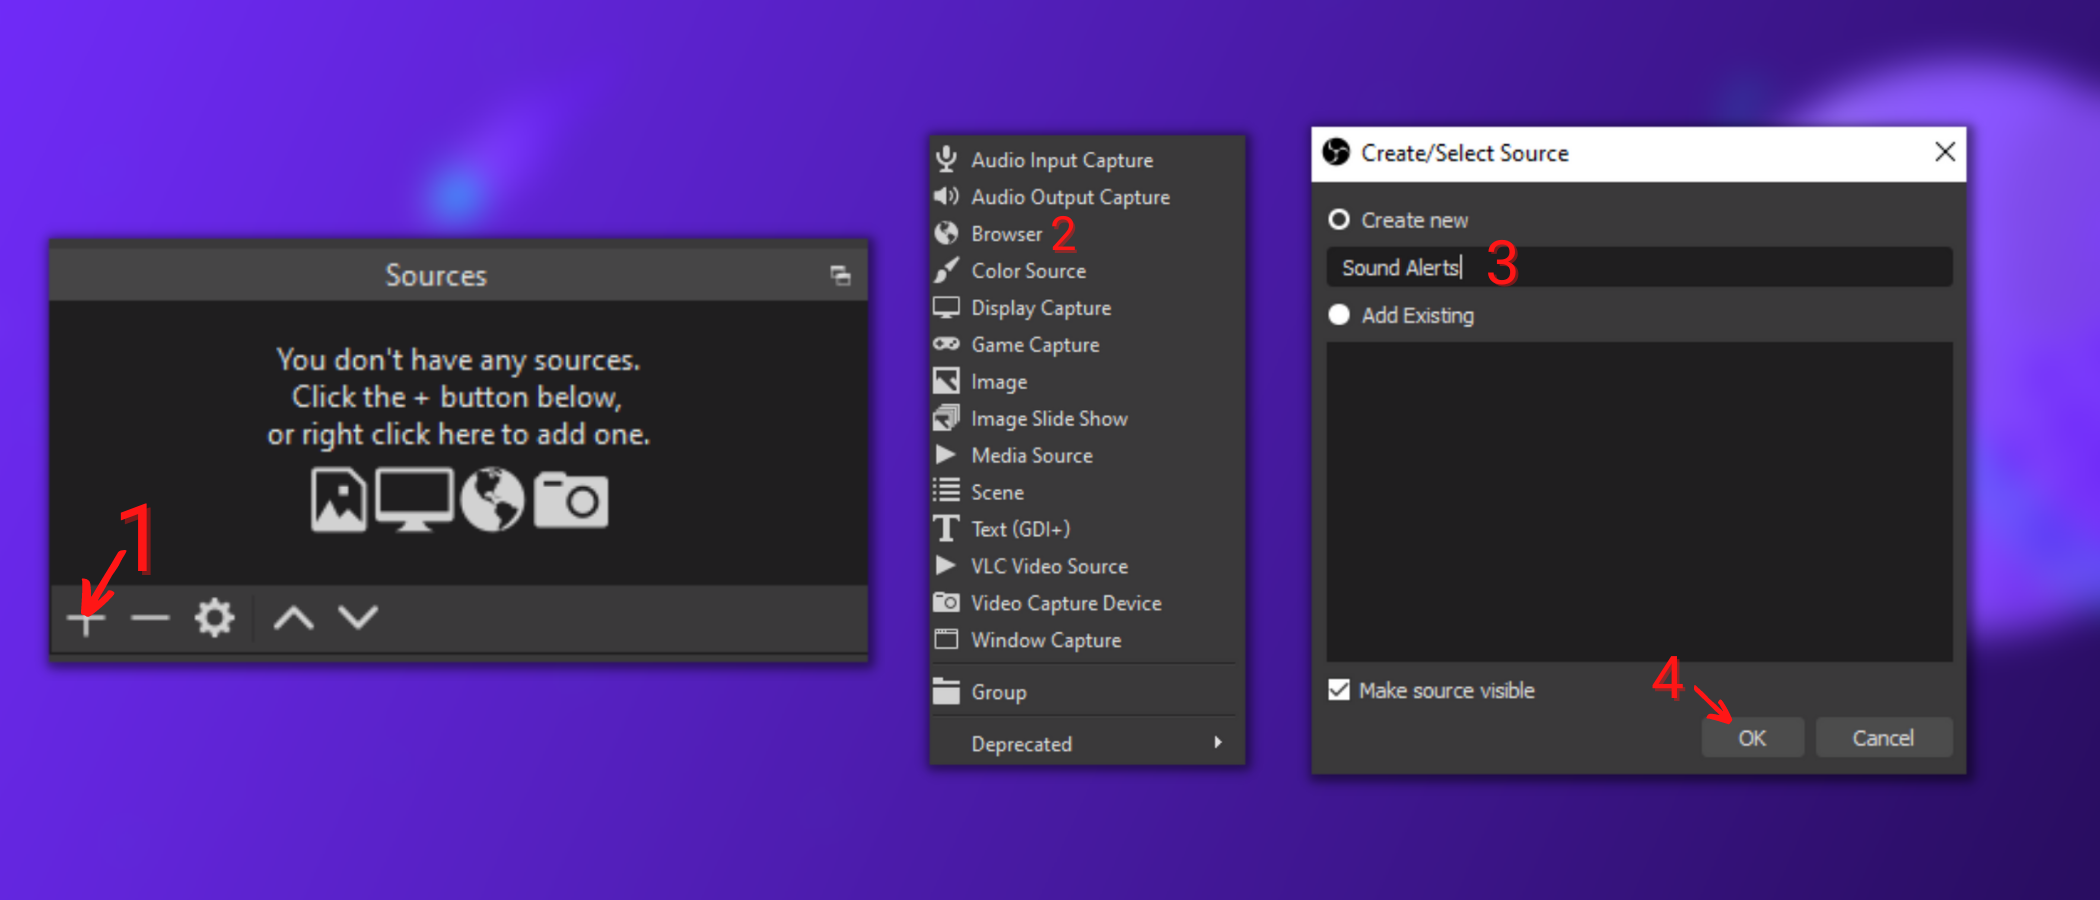
- (1) Copy the presented link in your Sound Alerts dashboard and hit the "+" button in the sources section of your broadcast software
- (2) Select "Browser"
- (3) Create a new source called "Sound Alerts"
- (4) Click the "OK" button
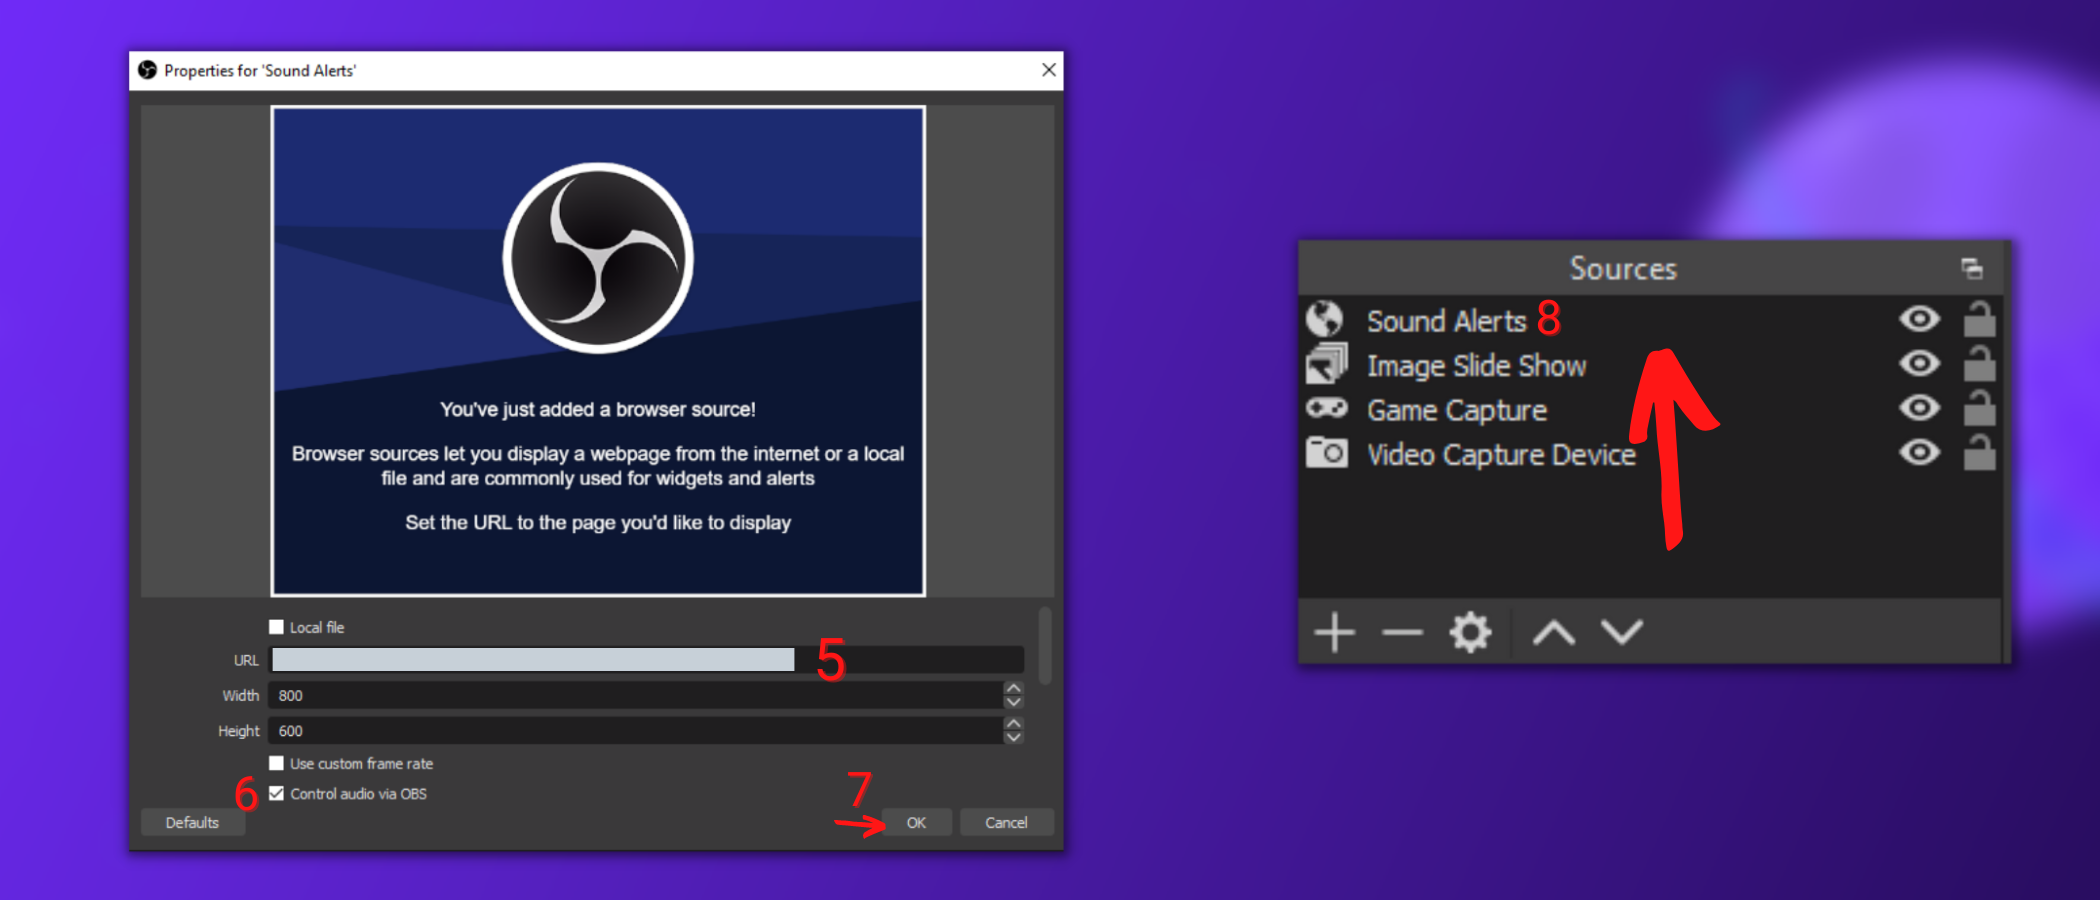
- (5) Moving on, a properties popup will appear - paste your copied Sound Alerts browser source URL into the URL section
- (6) Check the "Control Audio via OBS" setting
- (7) Click the "OK" button
- (8) The Sound Alerts browser source will now appear in your "Sources " section of OBS. Move it to the top of the list via drag and drop to ensure that your alerts are visible in your livestream later
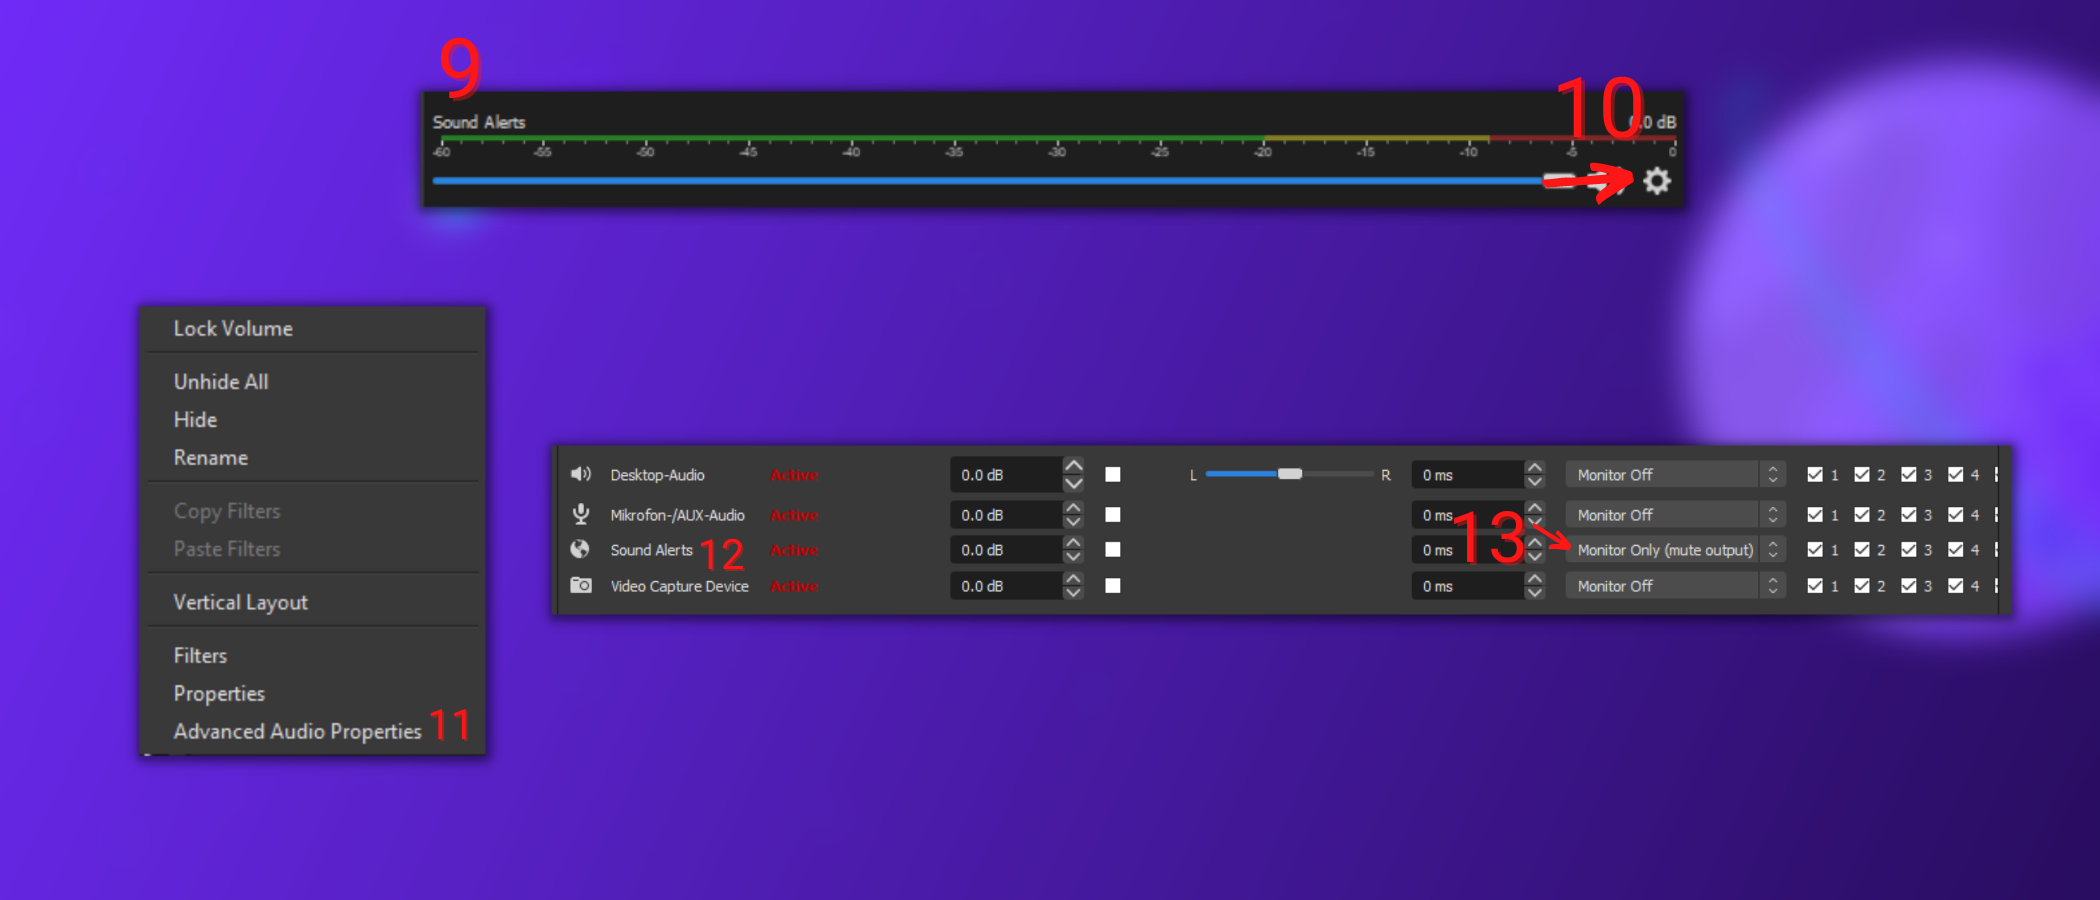
- (9) (10) To make sure that you can hear your alerts, click on the cogwheel connected to your Sound Alerts audio level in the "Audio Mixer" section on the right side
- (11) Click on "Advanced Audio Properties"
- (12) (13) Ensure that the settings for the Sound Alerts browser source show "Monitor only (mute output)" before you hit "close"
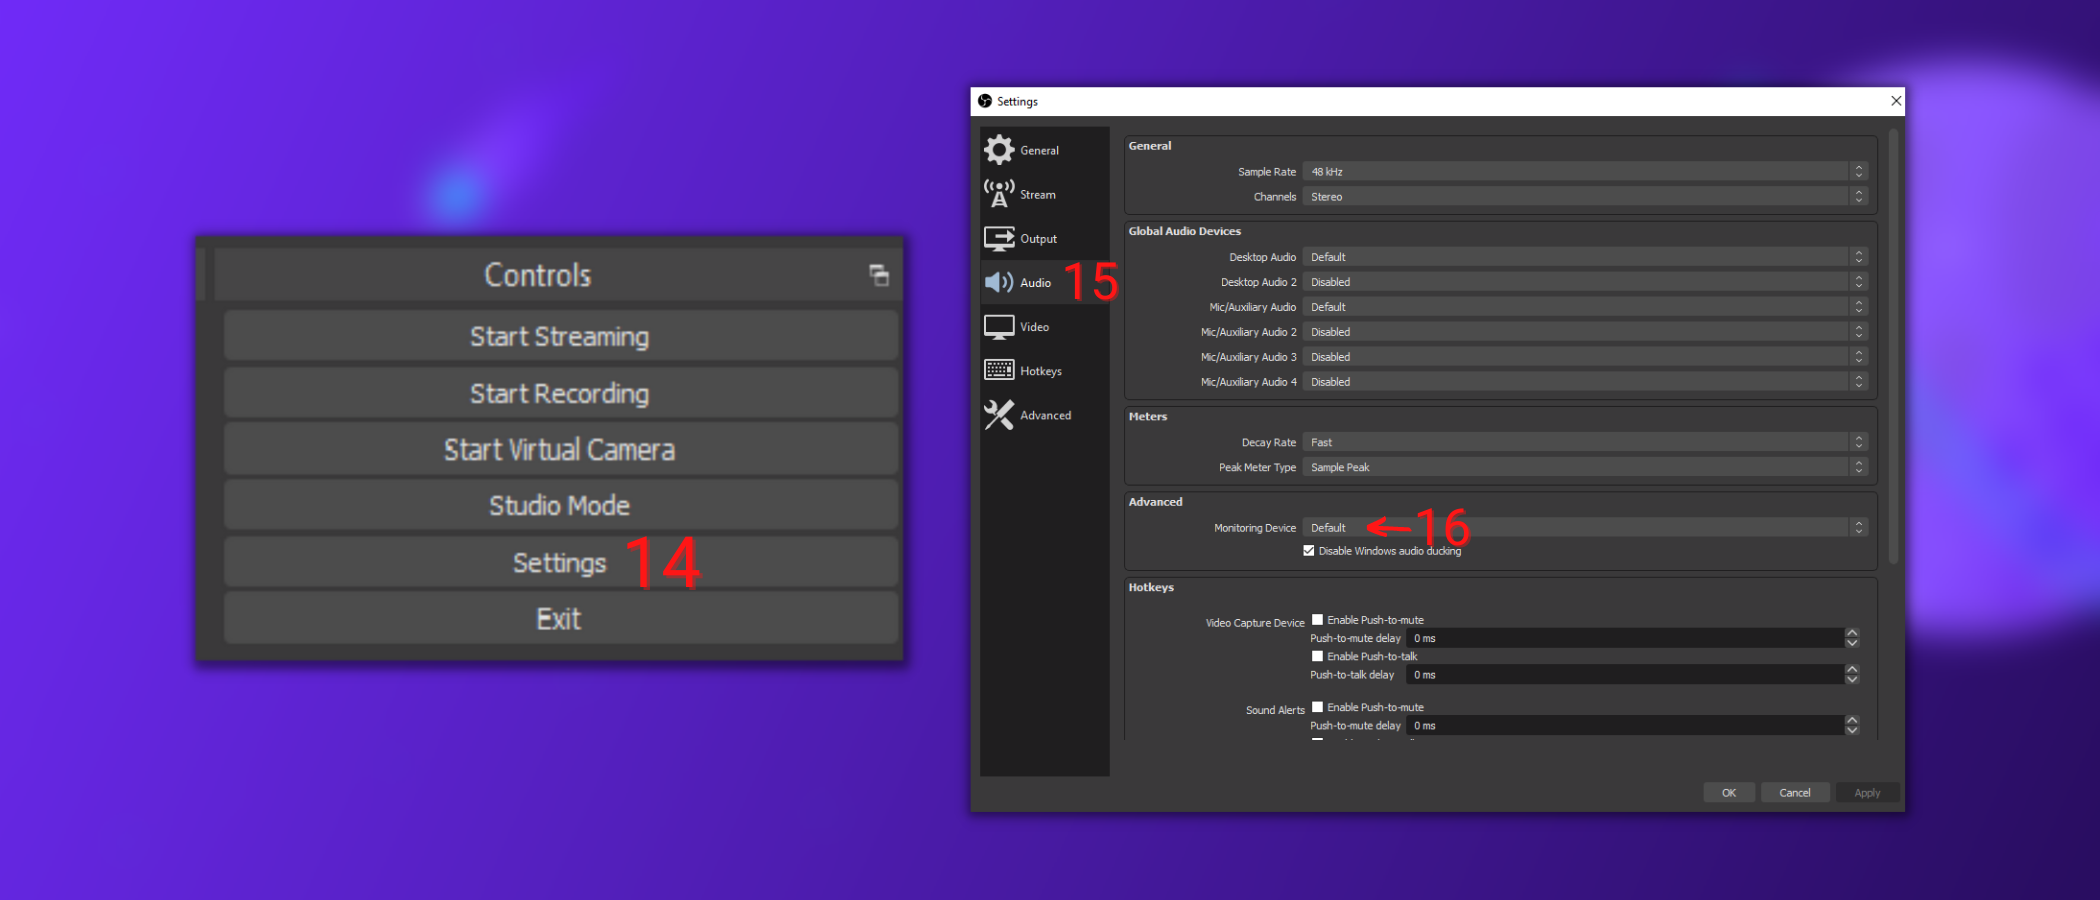
- (14) Ensure you have the correct monitoring audio device selected by selecting your OBS Studio settings on the left
- (15) Choose the "Audio" section on the left
- (16) Select the device you are using
Additionally, confirm that the "Desktop Audio" setting is "Monitor off".
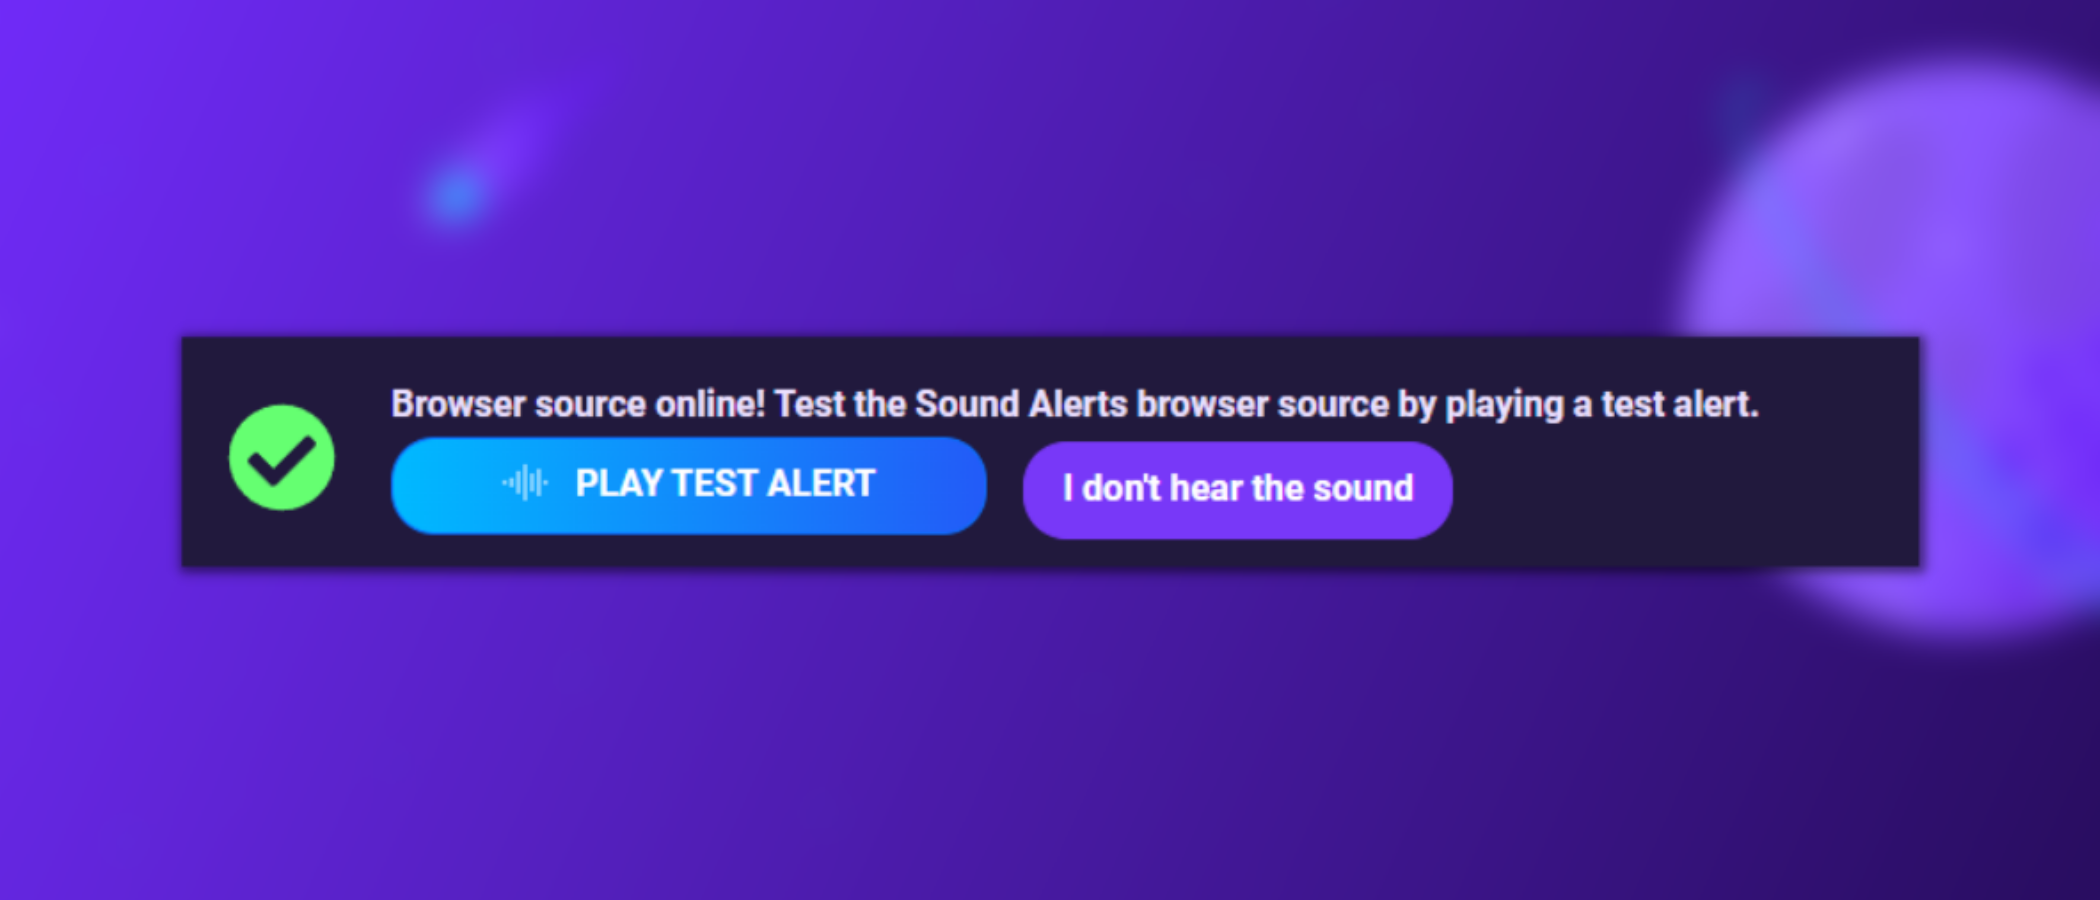
These were the final steps for the browser source implementation within OBS Studio. You can use the "Play Test Alert" function within the Sound Alerts dashboard to try it out. If you can hear the alert within OBS Studio, you are ready to move forward and set up your alerts.
If you can not hear the test alert, try to change the Audio Monitor Settings of your Sound Alerts Audio Mixer within OBS Studio to "Monitor and Output" (reference on the image below). If this solution does not work for you, feel free to join our Sound Alerts Discord server for dedicated support by our team.

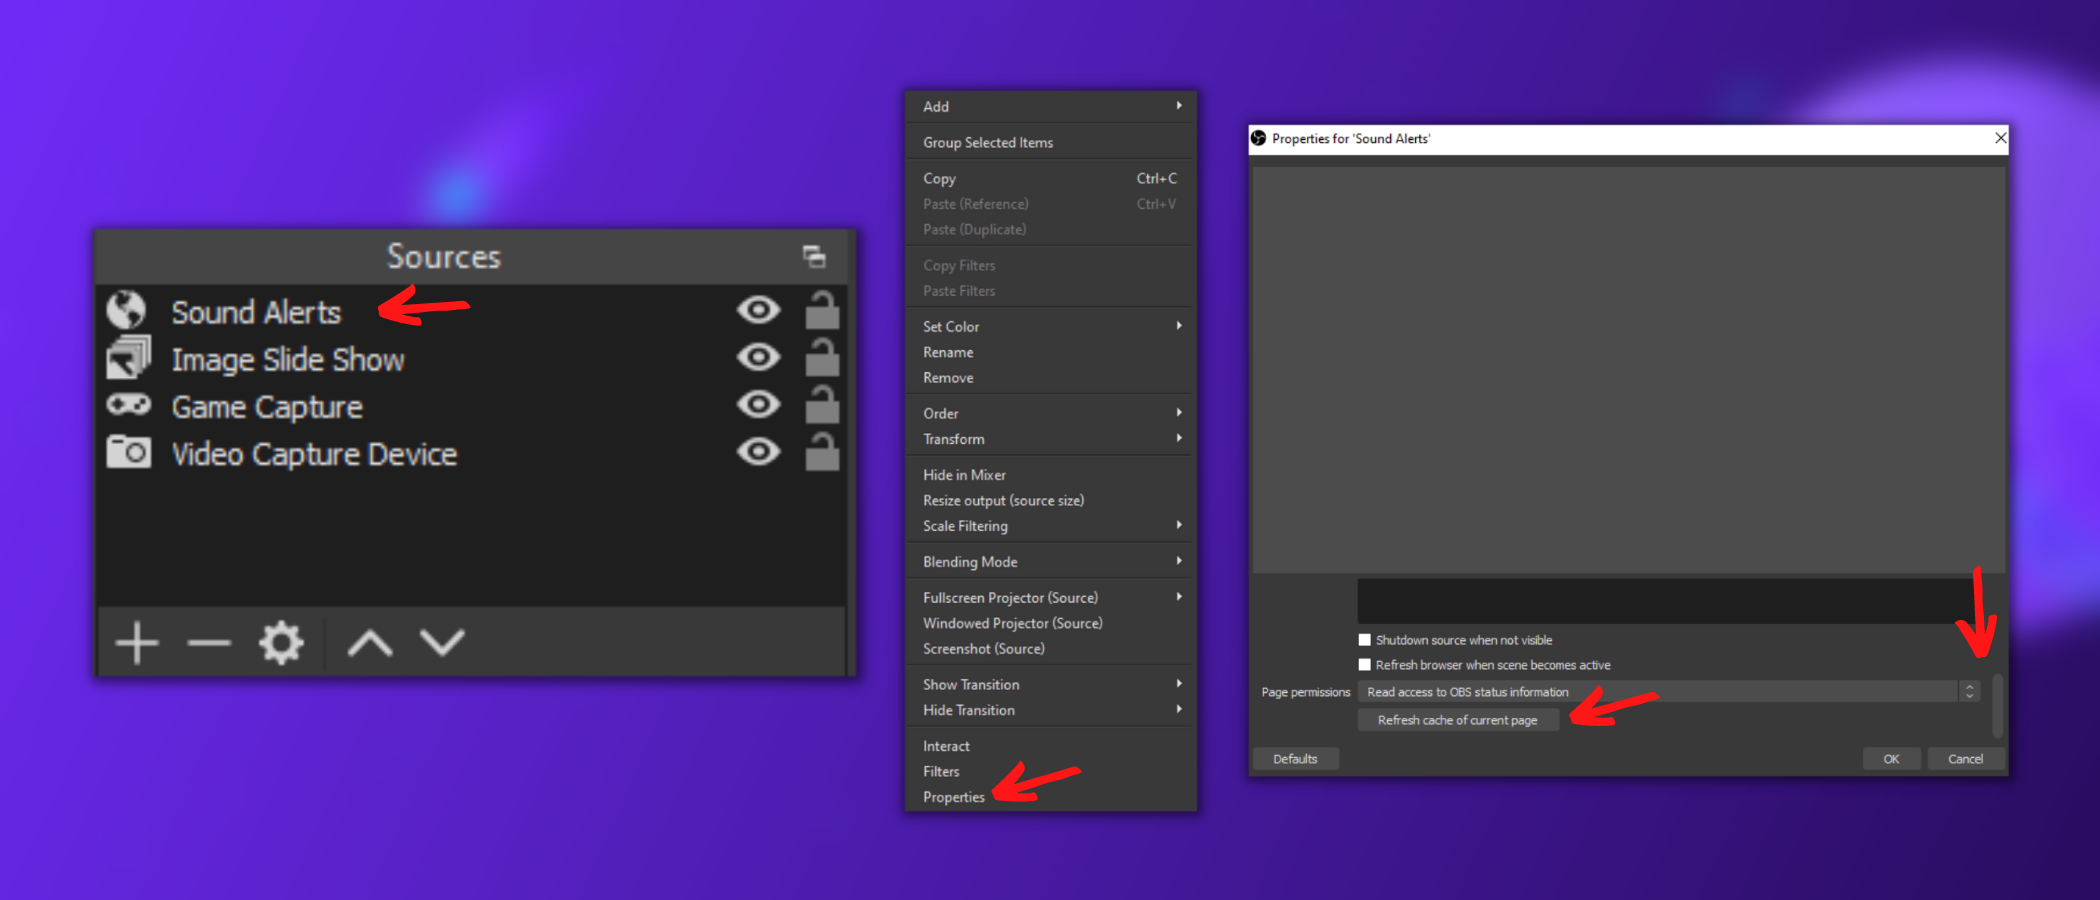
You can refresh your Sound Alerts browser source within your broadcast tool to resolve potential issues with your alerts (reference on the graphic down below). Just right-click the browser source, select "Properties", scroll down to "Refresh cache of current page", and hit the "OK" button.
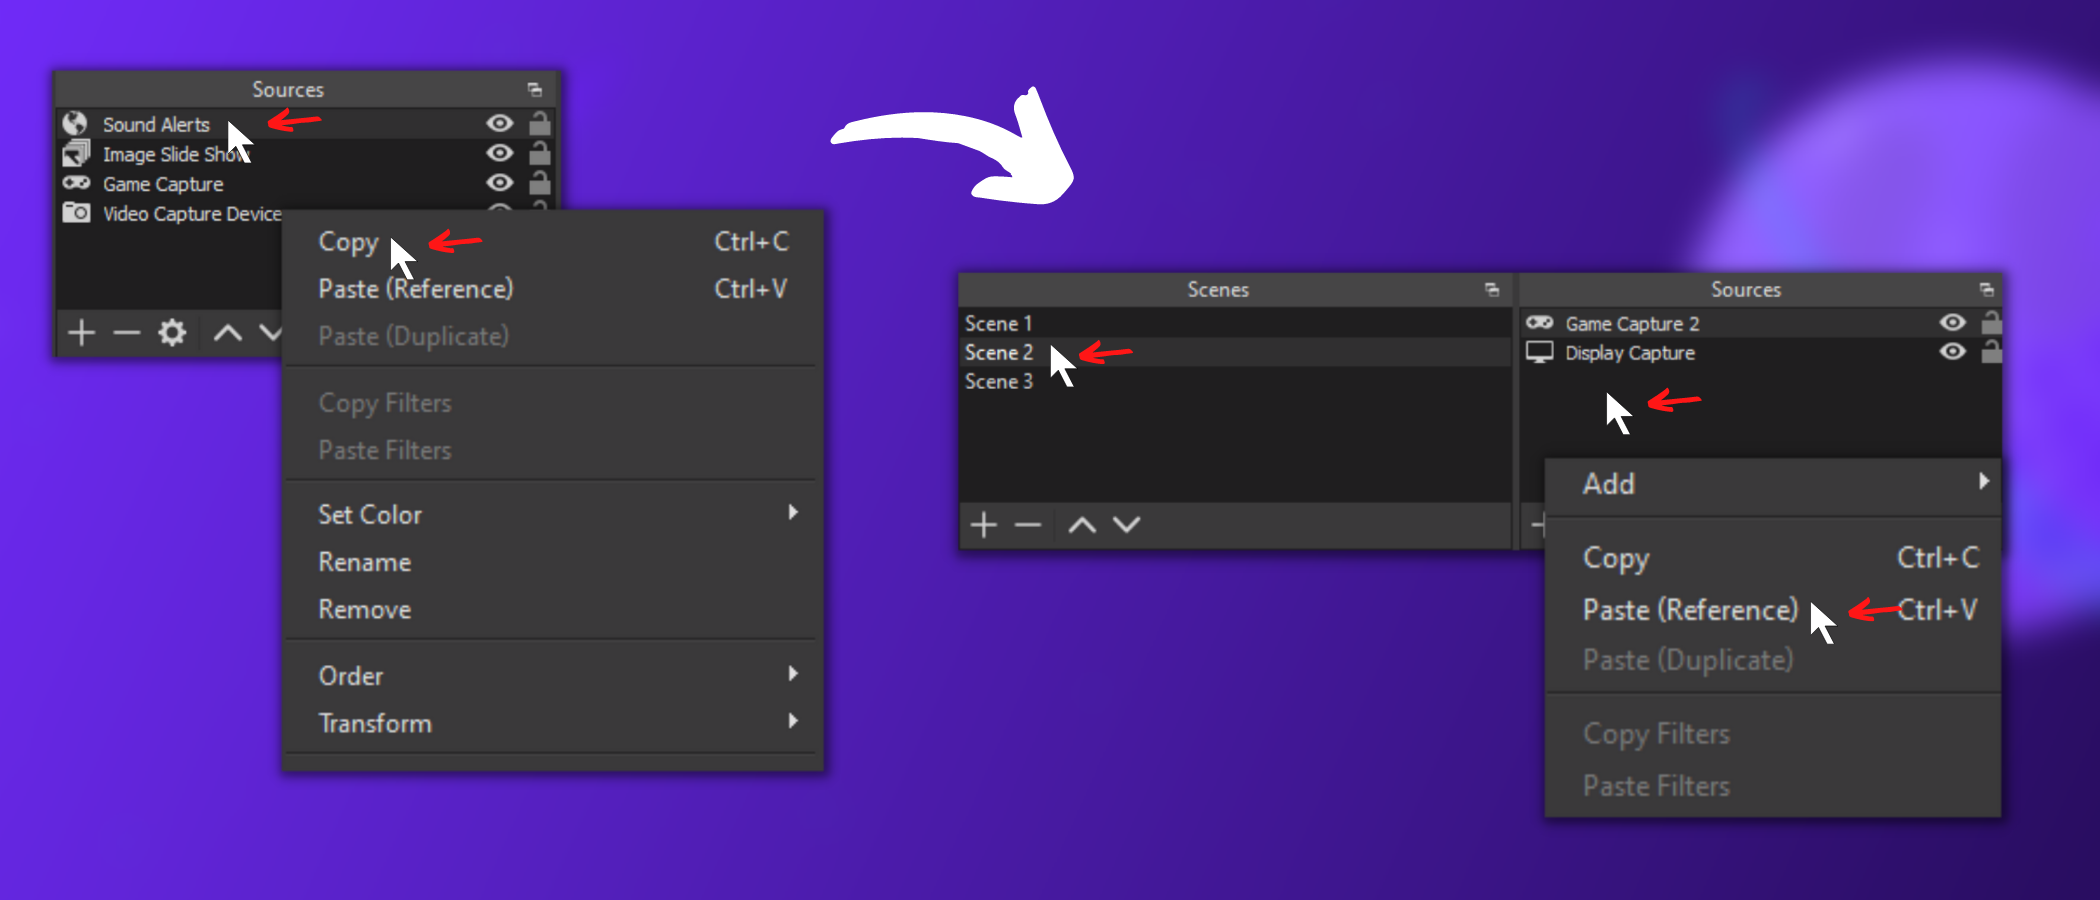
If you want to place the Sound Alerts browser source in multiple scenes, just copy it rather than create a new browser source for every scene. This way, you ensure that there is only one browser source playing that is referenced in all of your scenes.
2. Activate the Sound Alerts Twitch Extension
With the Sound Alerts Twitch Extension, you can enable an interactive soundboard controlled by your viewers - entirely for free. Activating the extension is optional, but we highly recommend it to increase the monetization and appeal of your livestream.
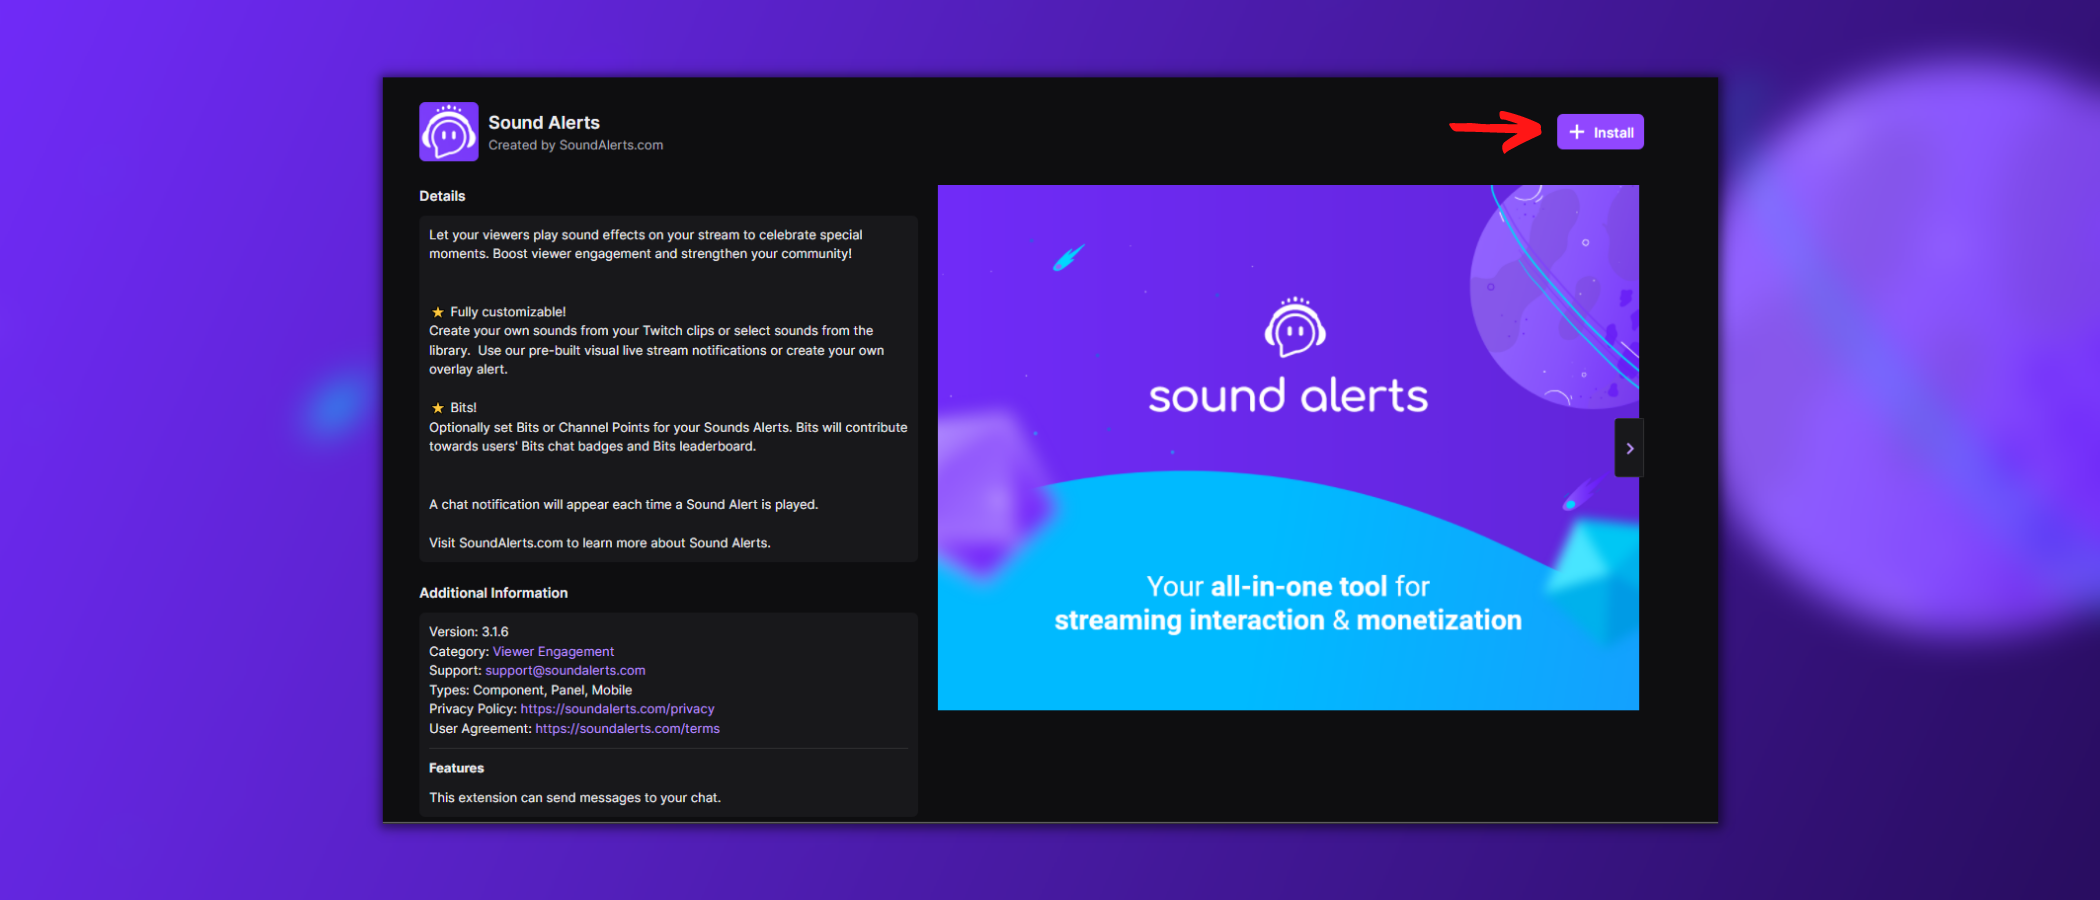
- Simply click on this link to visit the extension page within the Twitch dashboard and click on the "Install" button on the top right
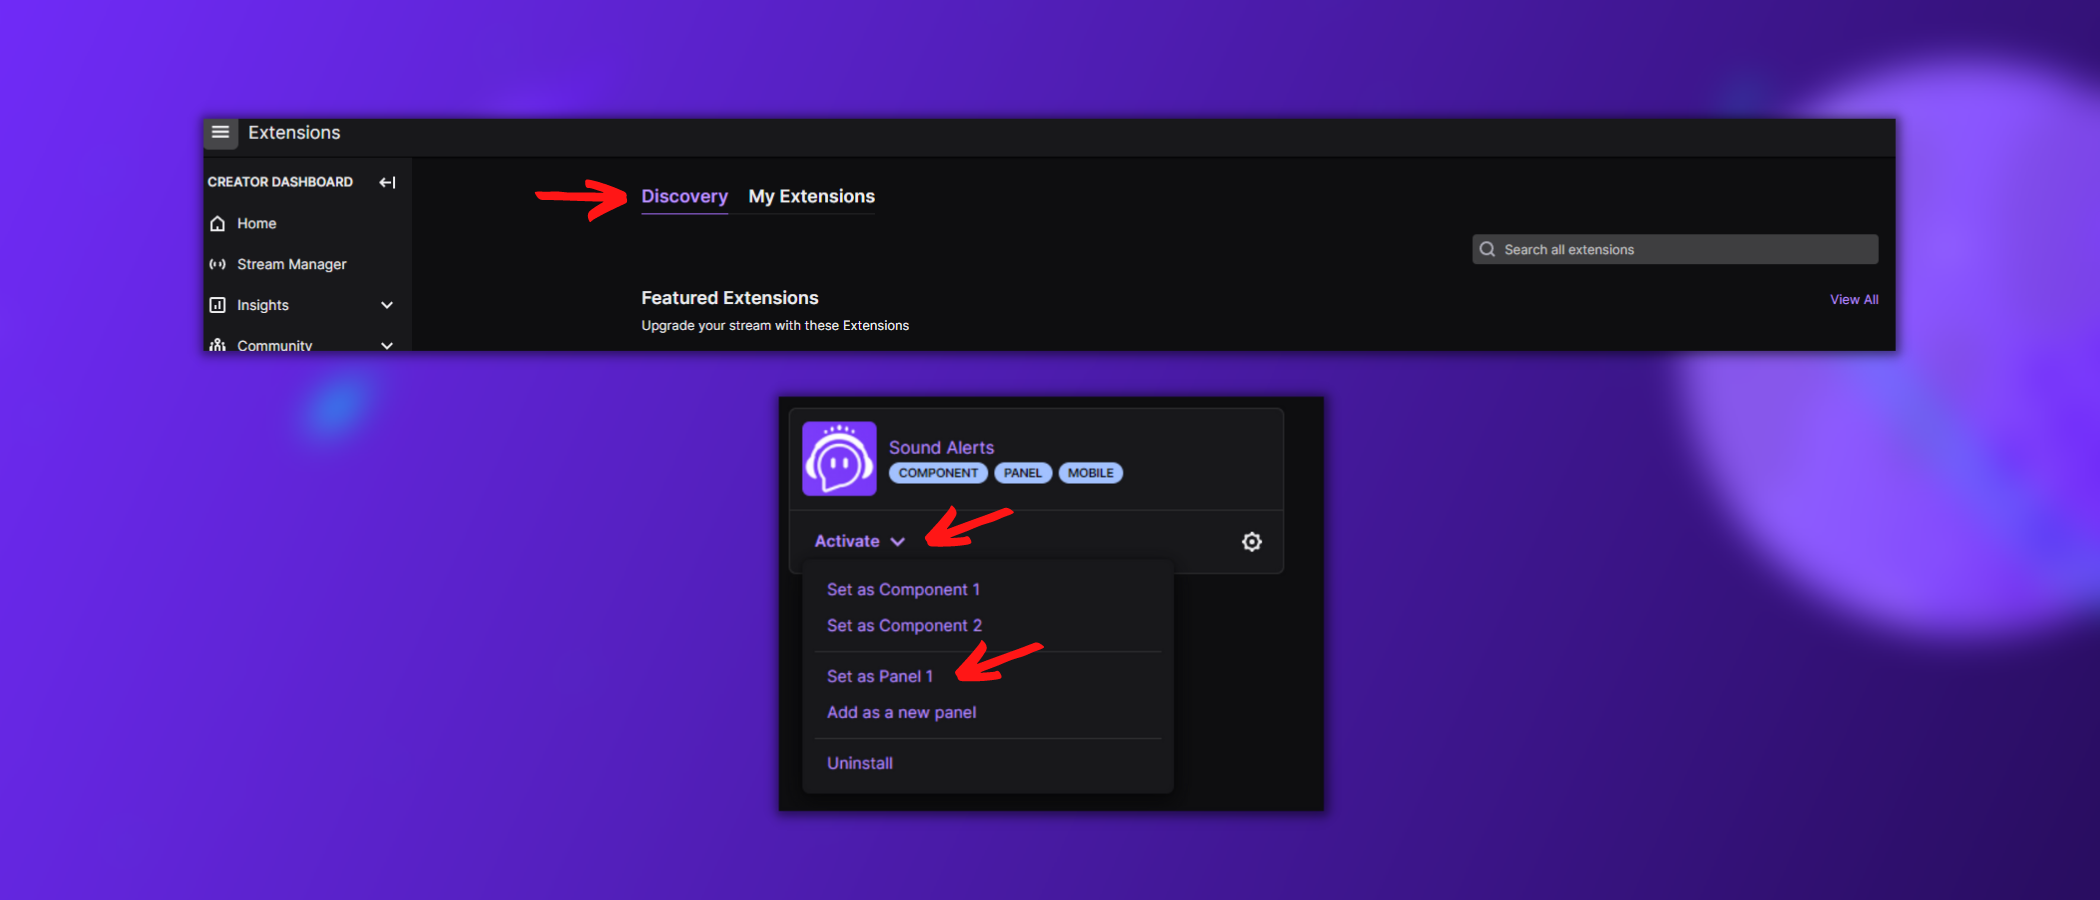
- Now you can activate the Twitch Extension by simply clicking on this link
- Head over to "My Extensions" and activate "Sound Alerts" as a component (directly visible in the livestream player) or as a panel (below your livestream)
We will add sounds and alerts to the soundboard in the upcoming part of this guide.
3. Creating Alerts in the Sound Alerts Dashboard
You can configure all of your livestream alerts within the Sound Alerts dashboard in one central hub. The following paragraphs will guide you through the process of implementing the available alert types.
3.1 Alerts for Bits
- To create alerts for Bits, you need to activate the Sound Alerts Twitch Extension (chapter 2 of this blog post) and hold the status of a Twitch Partner or Twitch Affiliate - streamers without this status can add the extension and make their sounds available at no cost for the viewers to increase interactivity
- Simply head over to this site and select a suitable sound from the community library: We usually recommend farts
- You can also upload your sound via the "Create new Sound" button on the top right (Twitch and YouTube Clips are also supported here)
- Then you hit the "+ Open" button of the sound and select "Extension"
- You can edit the name appearing for your viewers, and the Bits cost
- Finalize the process by clicking on "Add sound +"
- Repeat this process for multiple sounds to add various options for your viewers
You can also add a custom visual overlay to each alert - we will explain this further in chapter 4 of this blog post.

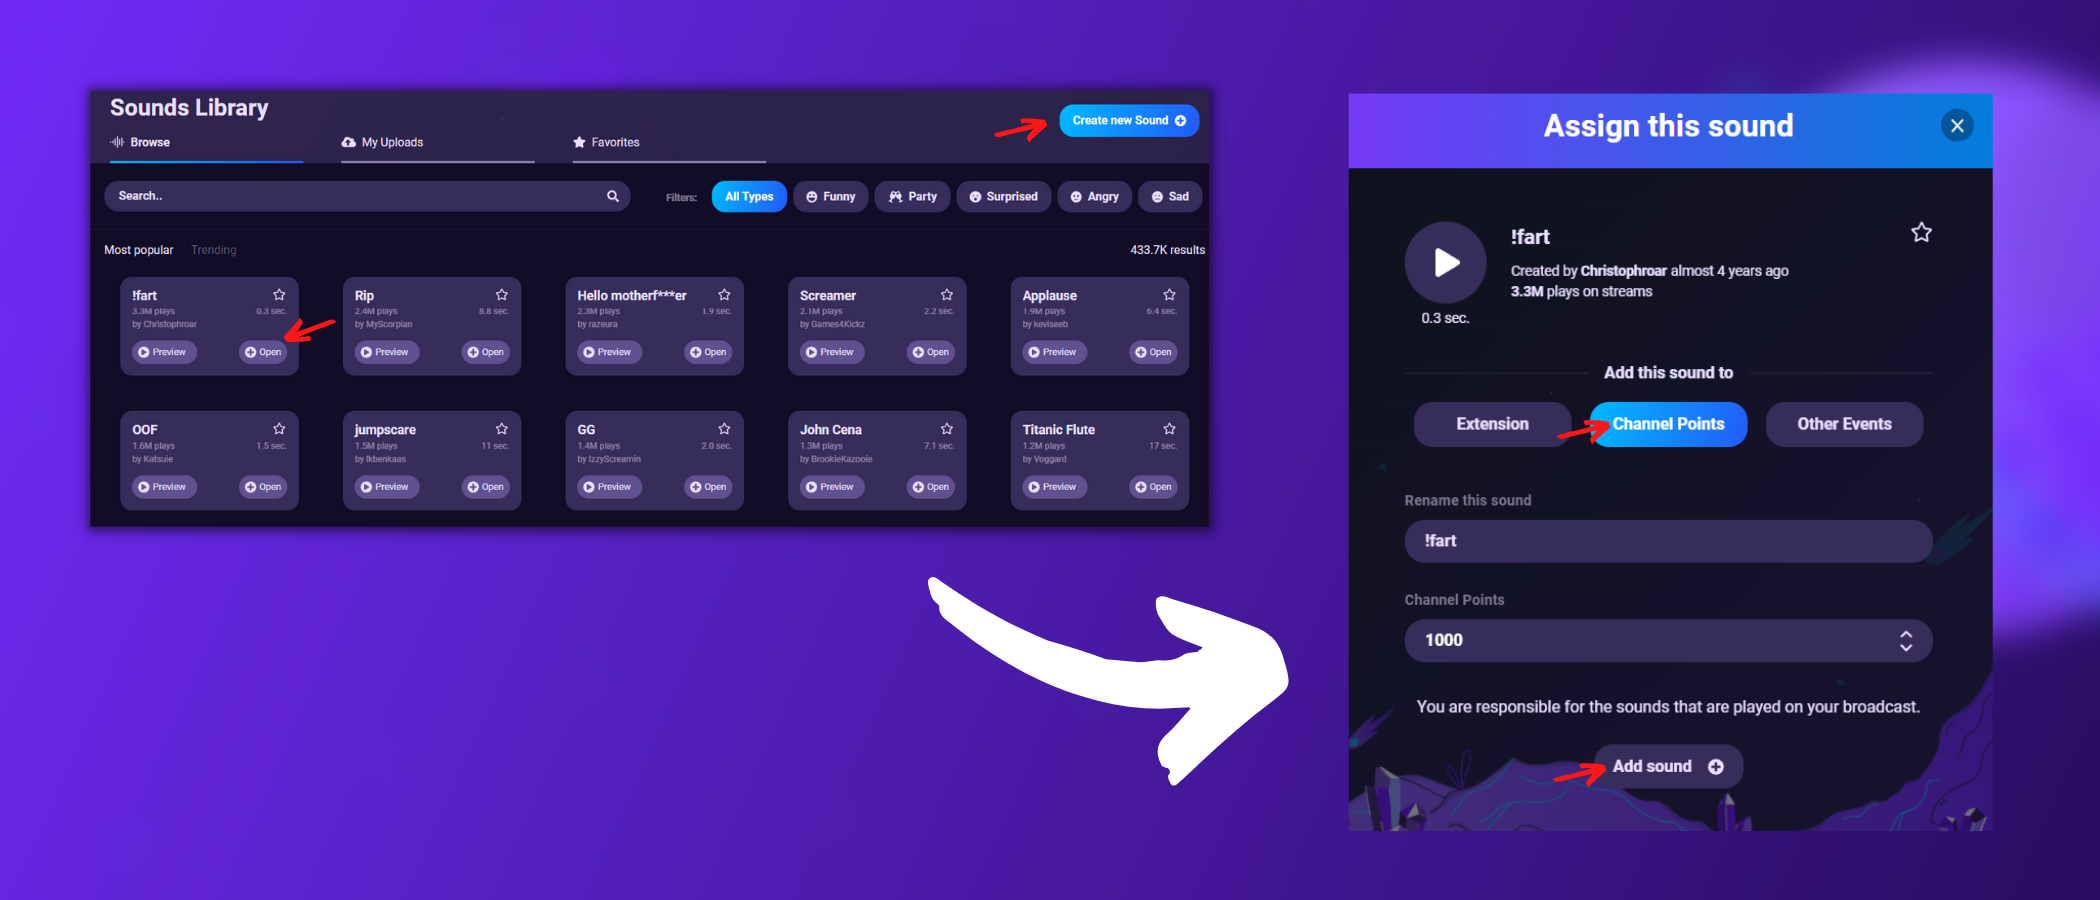
3.2 Alerts for Channel Points
- To create alerts for Channel Points, you need to activate the Sound Alerts Twitch Extension (chapter 2 of this blog post) and hold the status of a Twitch Partner or Twitch Affiliate - streamers without this status can add the extension and make their sounds available at no cost for the viewers to increase interactivity
- Simply head over to this site and select a suitable sound from the community library: We usually recommend farts
- You can also upload your sound via the "Create new Sound" button on the top right (Twitch and YouTube Clips are also supported here)
- Then you hit the "+ Open" button of the sound and select "Extension"
- You can edit the name appearing for your viewers and the Channel Points cost
- Finalize the process by clicking on "Add sound +"
- Repeat this process for multiple sounds to add various options for your viewers
You can also add a custom visual overlay to each alert - we will explain this further in chapter 4 of this blog post.
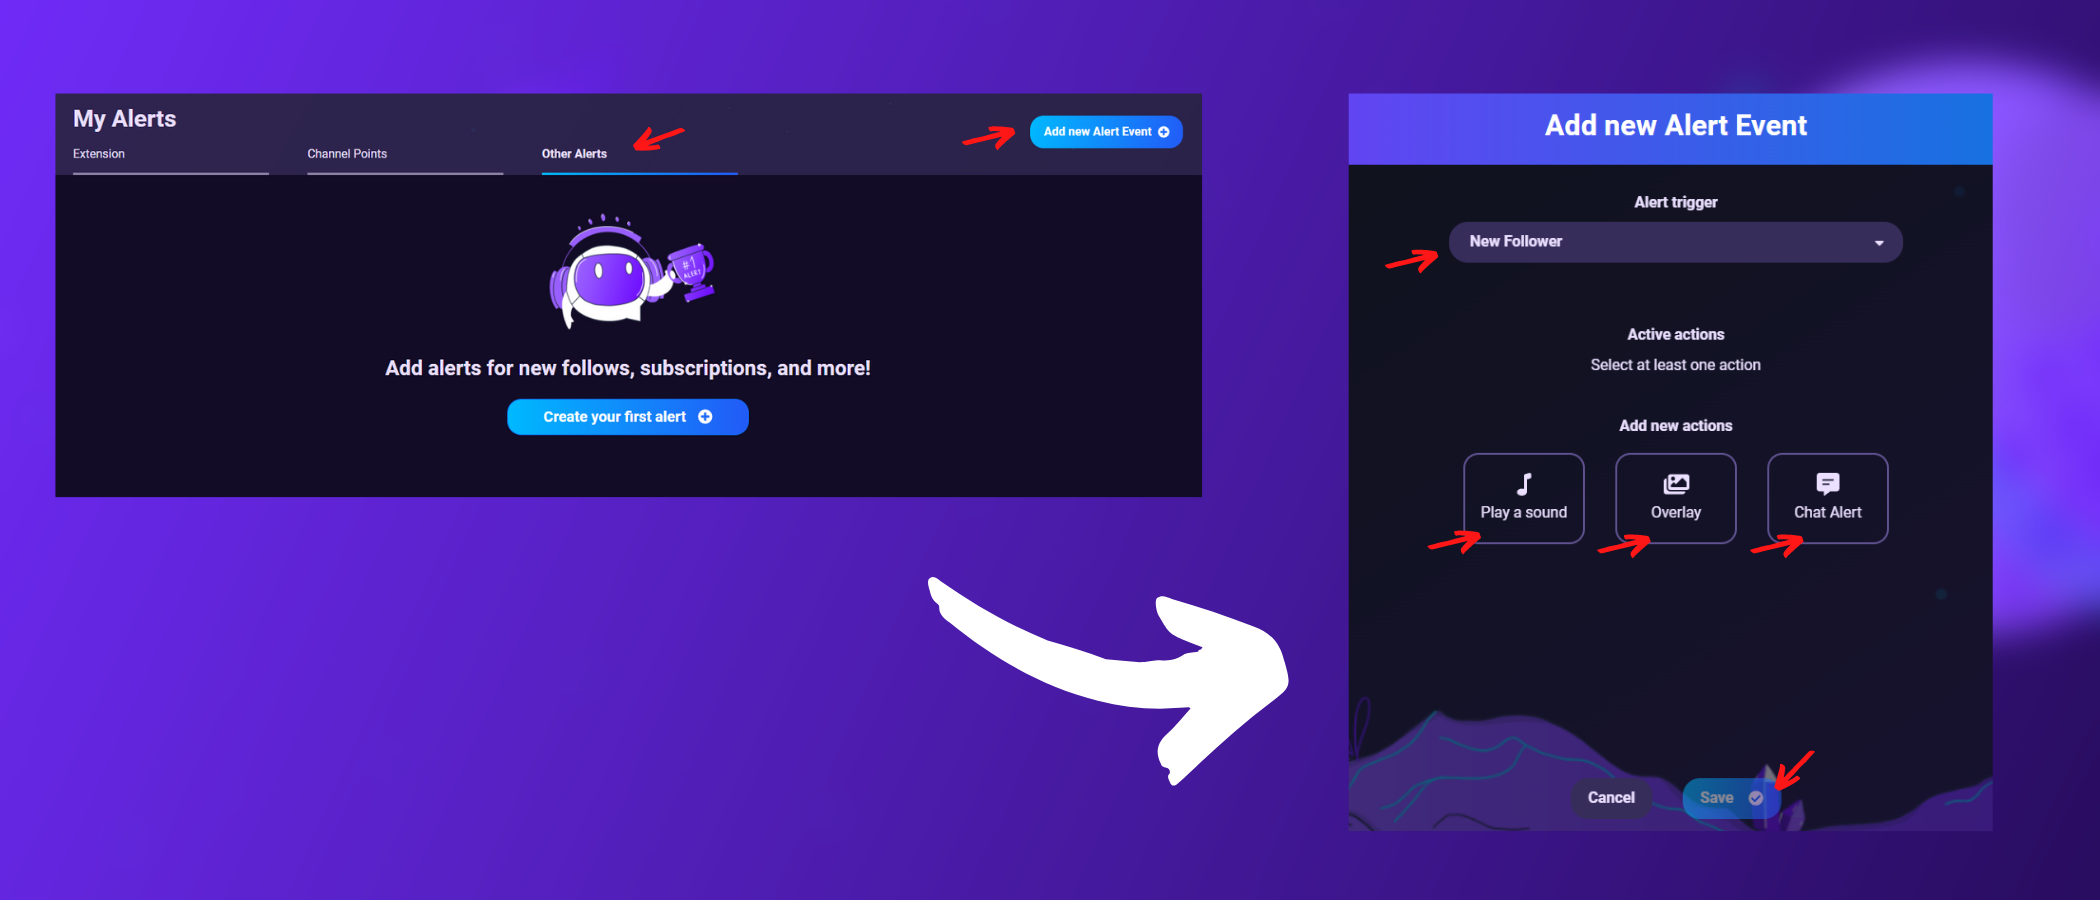
3.3 Alerts for Follows, Subs, Resubs, Cheers, Hype Trains, and Raids
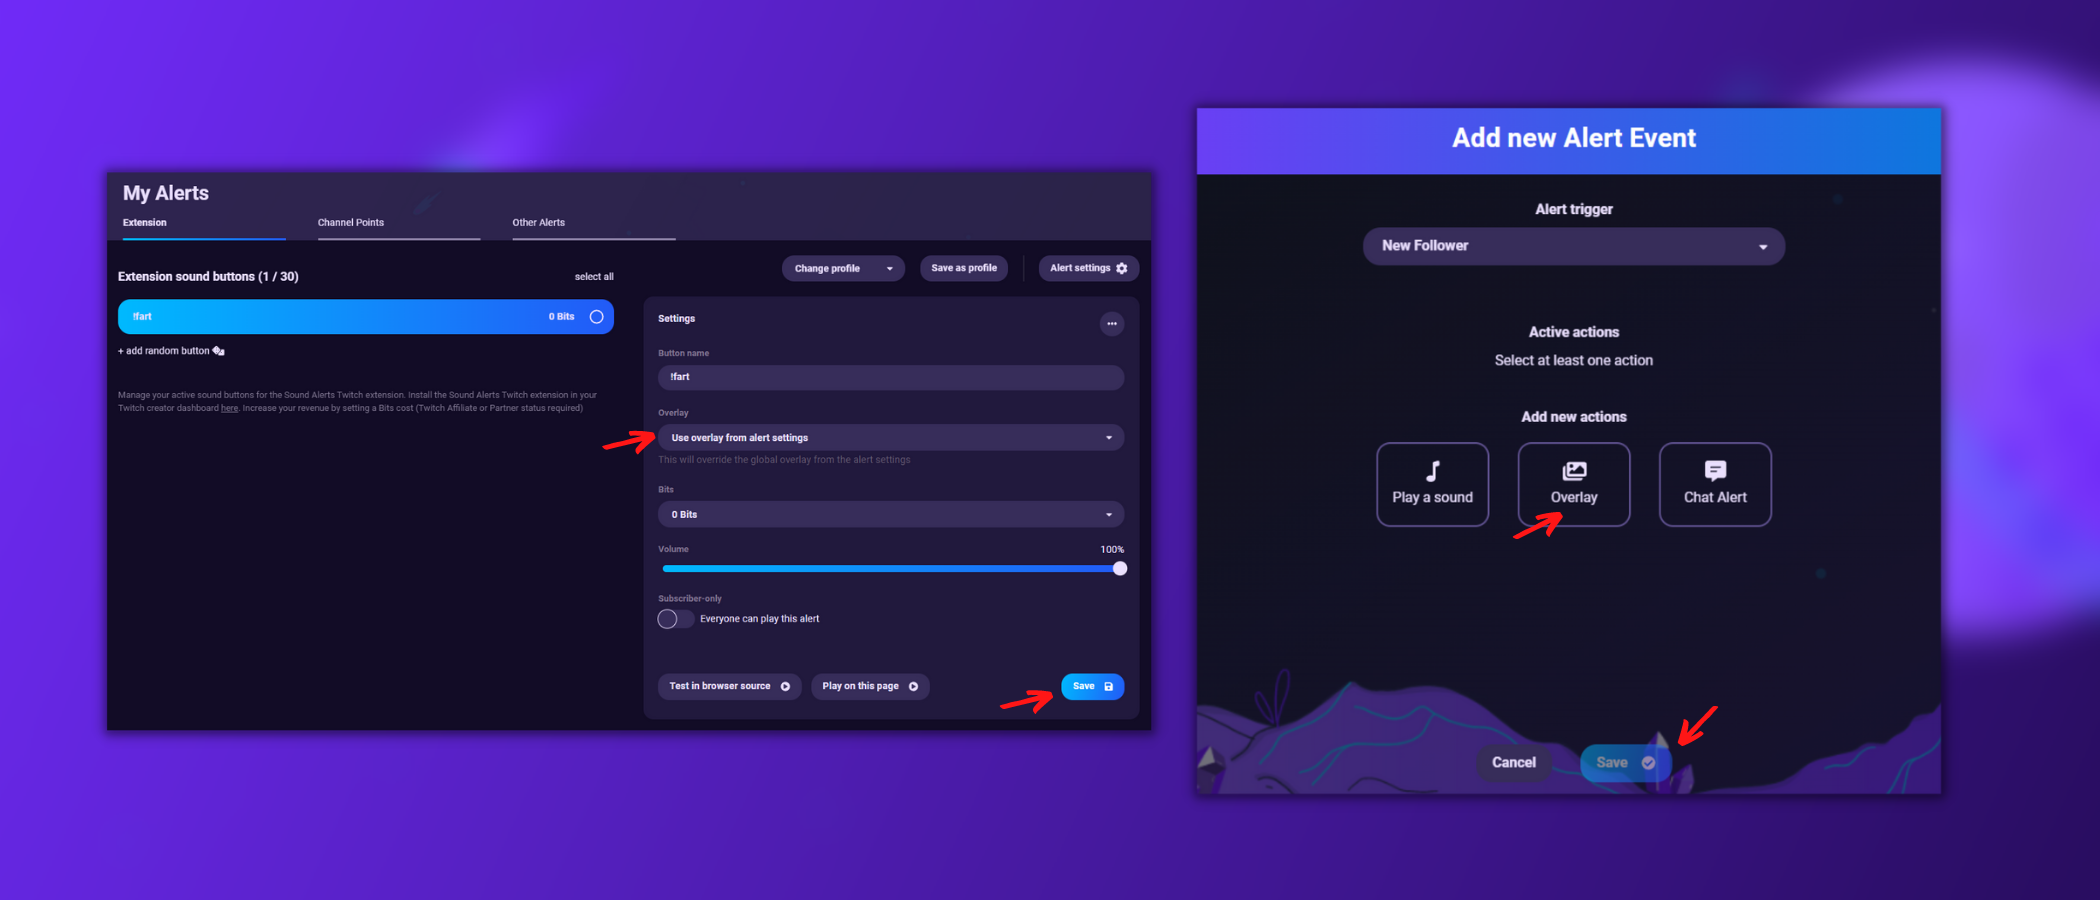
- To create an alert for various event types, simply head to this link and click on the "Add new Alert Event" button on the top right
- Select your "Alert Trigger" in the new window, and customize the sound, overlay, and chat alert within the "Add new actions" section
- After completing your alert, select the "Save" button at the bottom of the page
- You can even include text-to-speech alerts for certain alert types or add varying alerts for different lengths of resubscriptions by your loyal viewers
4. Designing your own visual overlays within Sound Alerts
The all-in-one livestream alert management tool allows you to design and implement your own alert overlays with a few clicks.
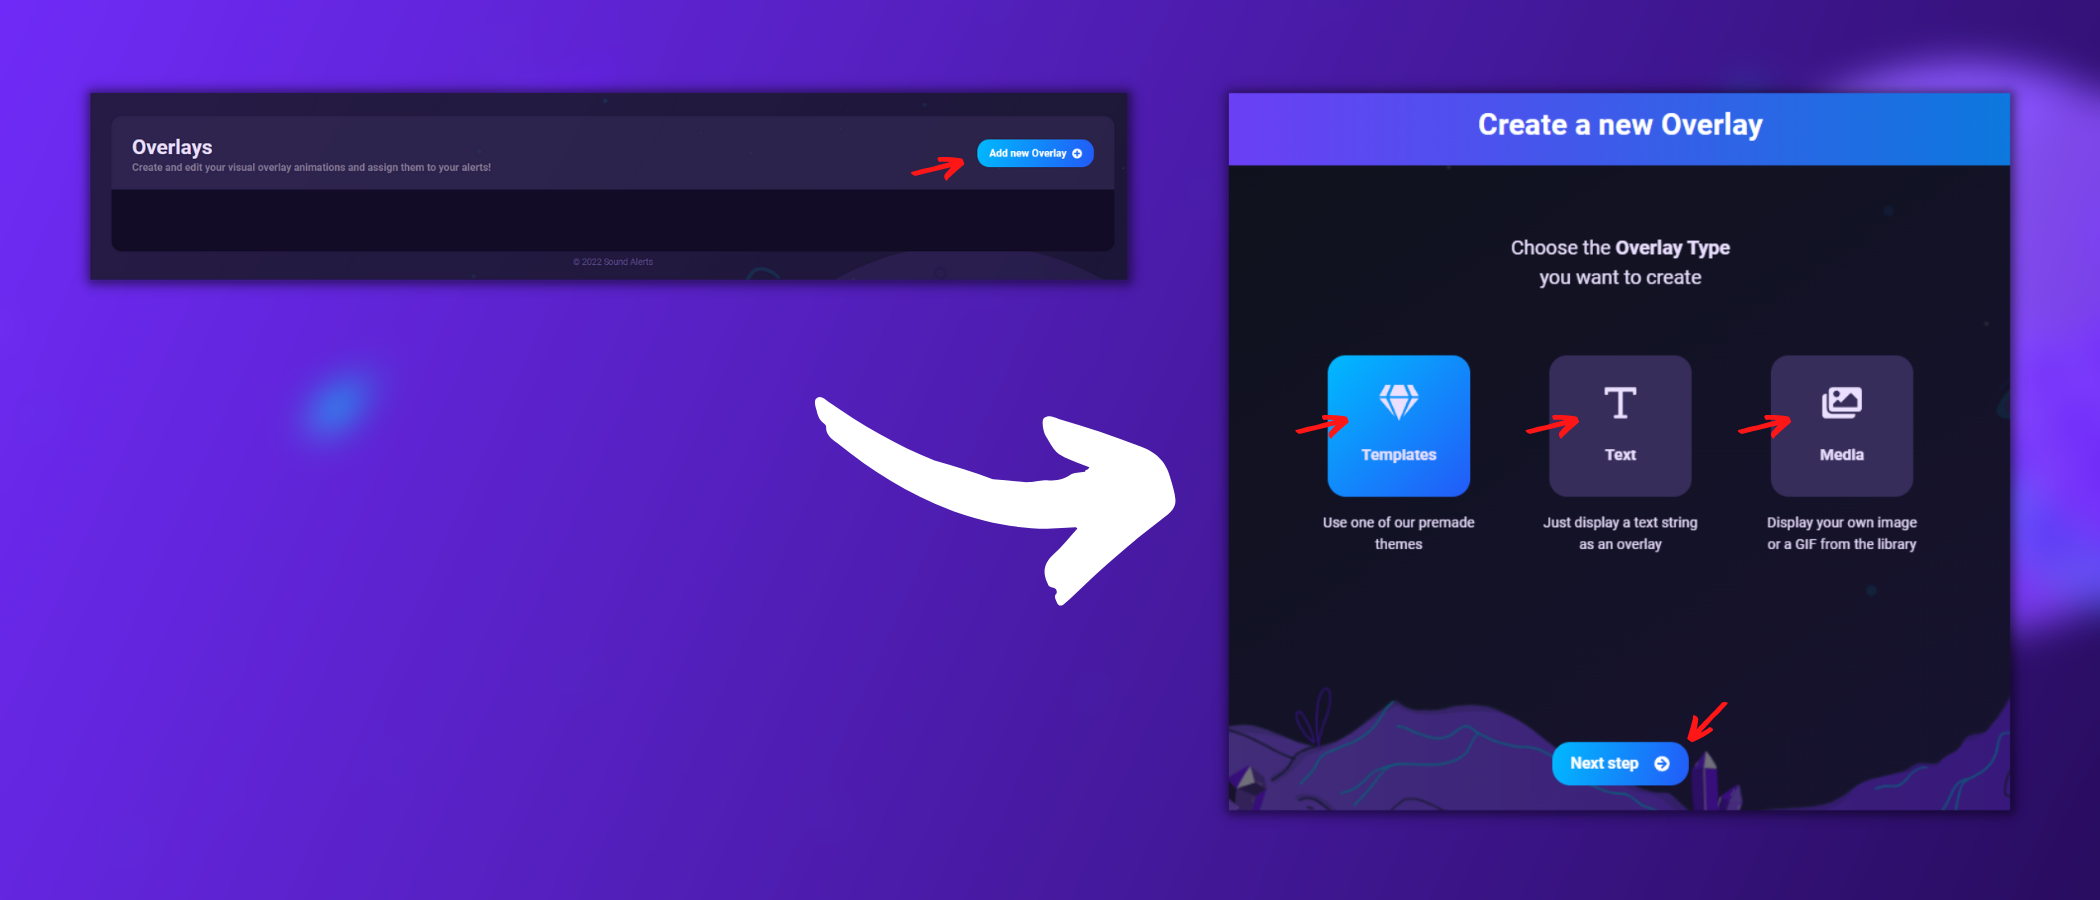
- Head over to the "Overlays" tab of the Sound Alerts dashboard and click on the "Add new Overlay" button on the top right
- The new window will show you three options for creating a visual overlay for your alert:
- Templates (Use on our pre-made templates)
- Text (Text-only overlays without any graphics)
- Media (Upload your own graphics or select one from the GIF library)
- Choose your preferred option and continue with the configuration as displayed on the window
- If you are satisfied, simply save the new overlay with the "Save overlay" button on the bottom right
- You can repeat these steps to create a variety of visual overlays for different alerts and alert types
- After the creation of your overlay, you just need to assign it to your created alerts
- Click on this link to head over to the "My Alerts" tab and select your preferred overlays in the settings
- Do not forget to save your progress with the "save" button
5. And that's it for your Sound Alerts Setup
By following chapters one to five, you successfully completed the setup of Sound Alerts for your livestream - congratulations! If you still face problems after this guide, do not worry: You can join our Discord server to talk to our team of Sound Alerts experts.
Make sure to request new features in our Sound Alerts ideas board to improve the application with your thoughts.
Thank you for using our Sound Alerts - we will keep you posted about new features, and updates on the Sound Alerts socials and this blog. Until then - happy streaming!


