How to mute Sound Alerts in your Livestream VODs (Beginners Guide)

Let's be honest: Sound Alerts is probably one of the best ways to engage with your audience and enable monetization in your livestream. But when it comes to your VODs, there are occasions you don't want to hear these alerts in your videos on Twitch, YouTube, or other platforms. Broadcasting tools like OBS or Streamlabs Desktop (SLOBS) offer the possibility to mute Sound Alerts in your VODs so that you do not have to worry about many farts or sirens appearing in your videos.
In this guide, we will show you how to:
- mute Sound Alerts in your Twitch VODs using OBS
- mute Sound Alerts in your livestream recordings using OBS
- mute Sound Alerts in your Twitch VODs using Streamlabs Desktop (SLOBS)
- mute Sound Alerts in your livestream recordings using Streamlabs Desktop (SLOBS)
Mute Sound Alerts in your Twitch VODs using OBS
In the following paragraphs, we will provide you with a small walkthrough of all the settings you need to successfully mute Sound Alerts in your Twitch VODs with OBS.
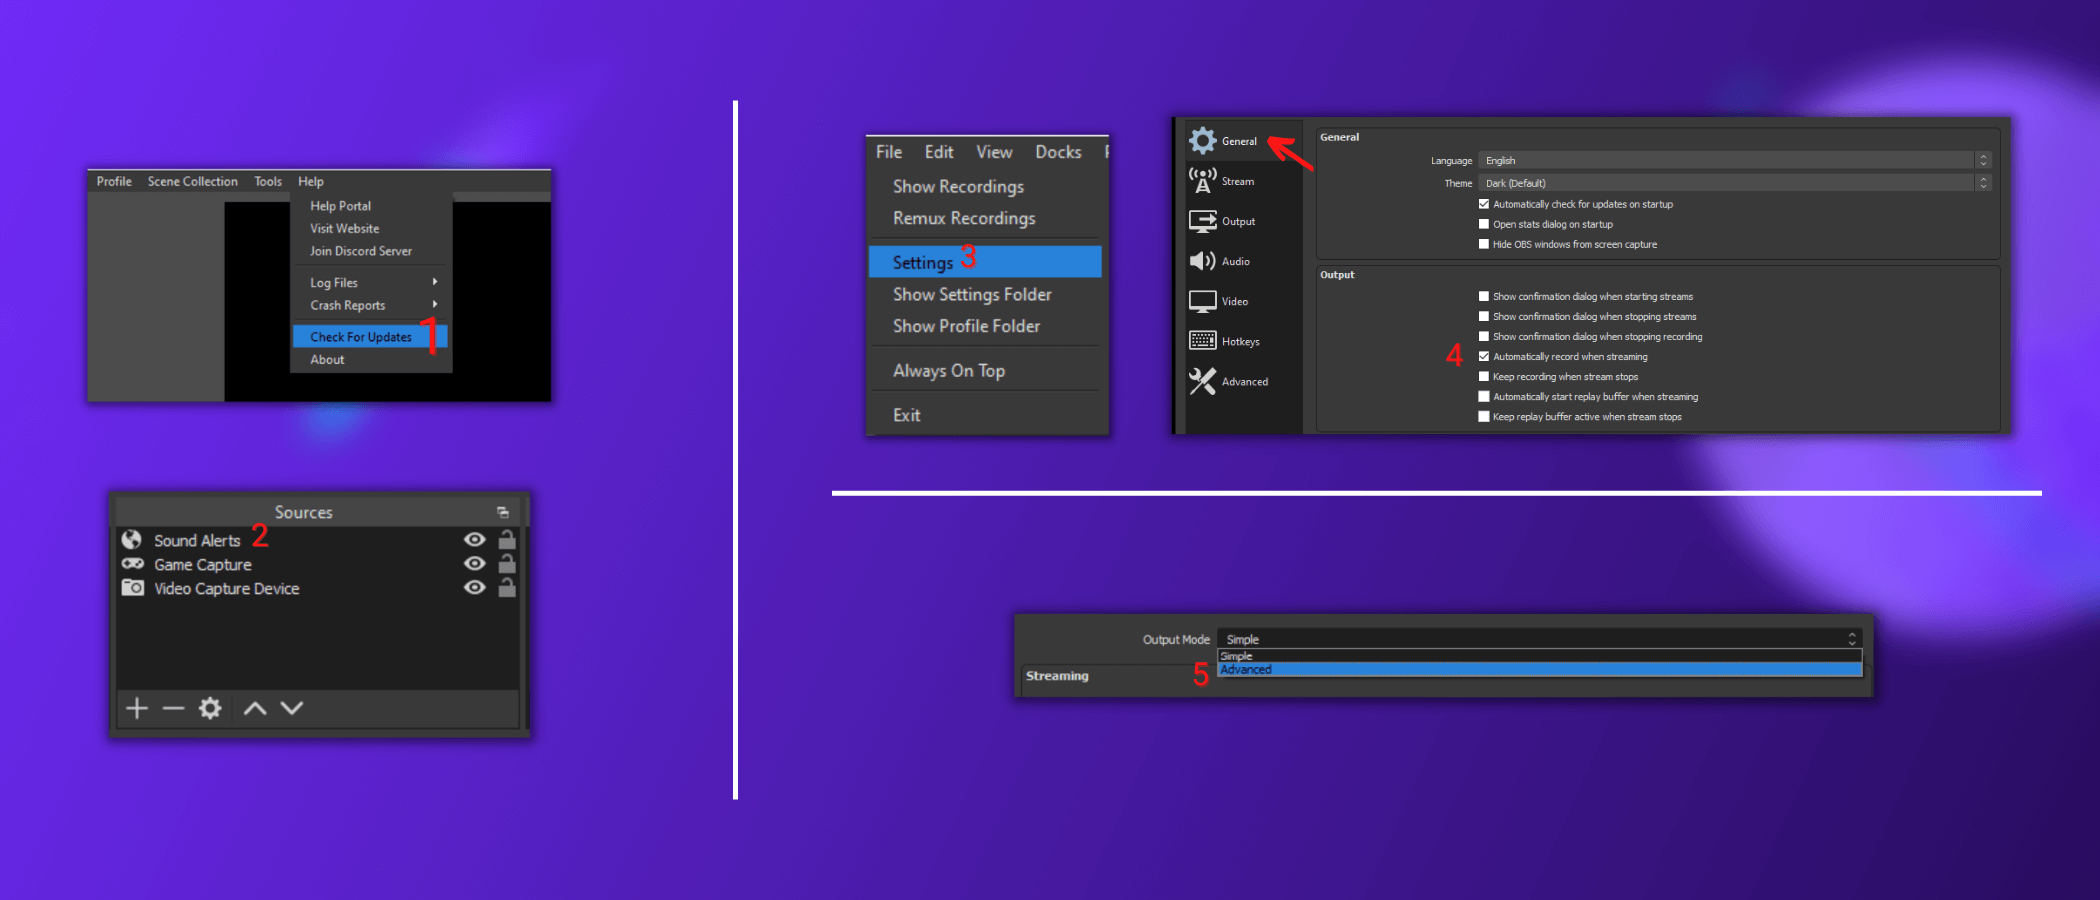
- (1) First of all, ensure that you are using the newest version of OBS: To do that, simply click on "Help" on the top and select the option "Check for Updates" in the dropdown menu.
- (2) Add the Sound Alerts browser source to OBS and ensure that the "Control Audio via OBS" option is selected in the browser source properties: We have a separate video guide for that process which you can find here. Ignore this step if your Sound Alerts browser source is already up and running.
- (3) Click on "File" on the top left and select "Settings".
- (4) In the new window, select "Output" on the left and change your "Output Mode" to "Advanced" in the top center.
- (5) In the tab "Streaming", enable the "Twitch VOD Track" option and select an Audio Track. We will choose number two in this example and recommend you do so, but please note that you can choose a different number depending on your audio setup.
- (6) Select the "Apply" and the "OK" button in the bottom right.

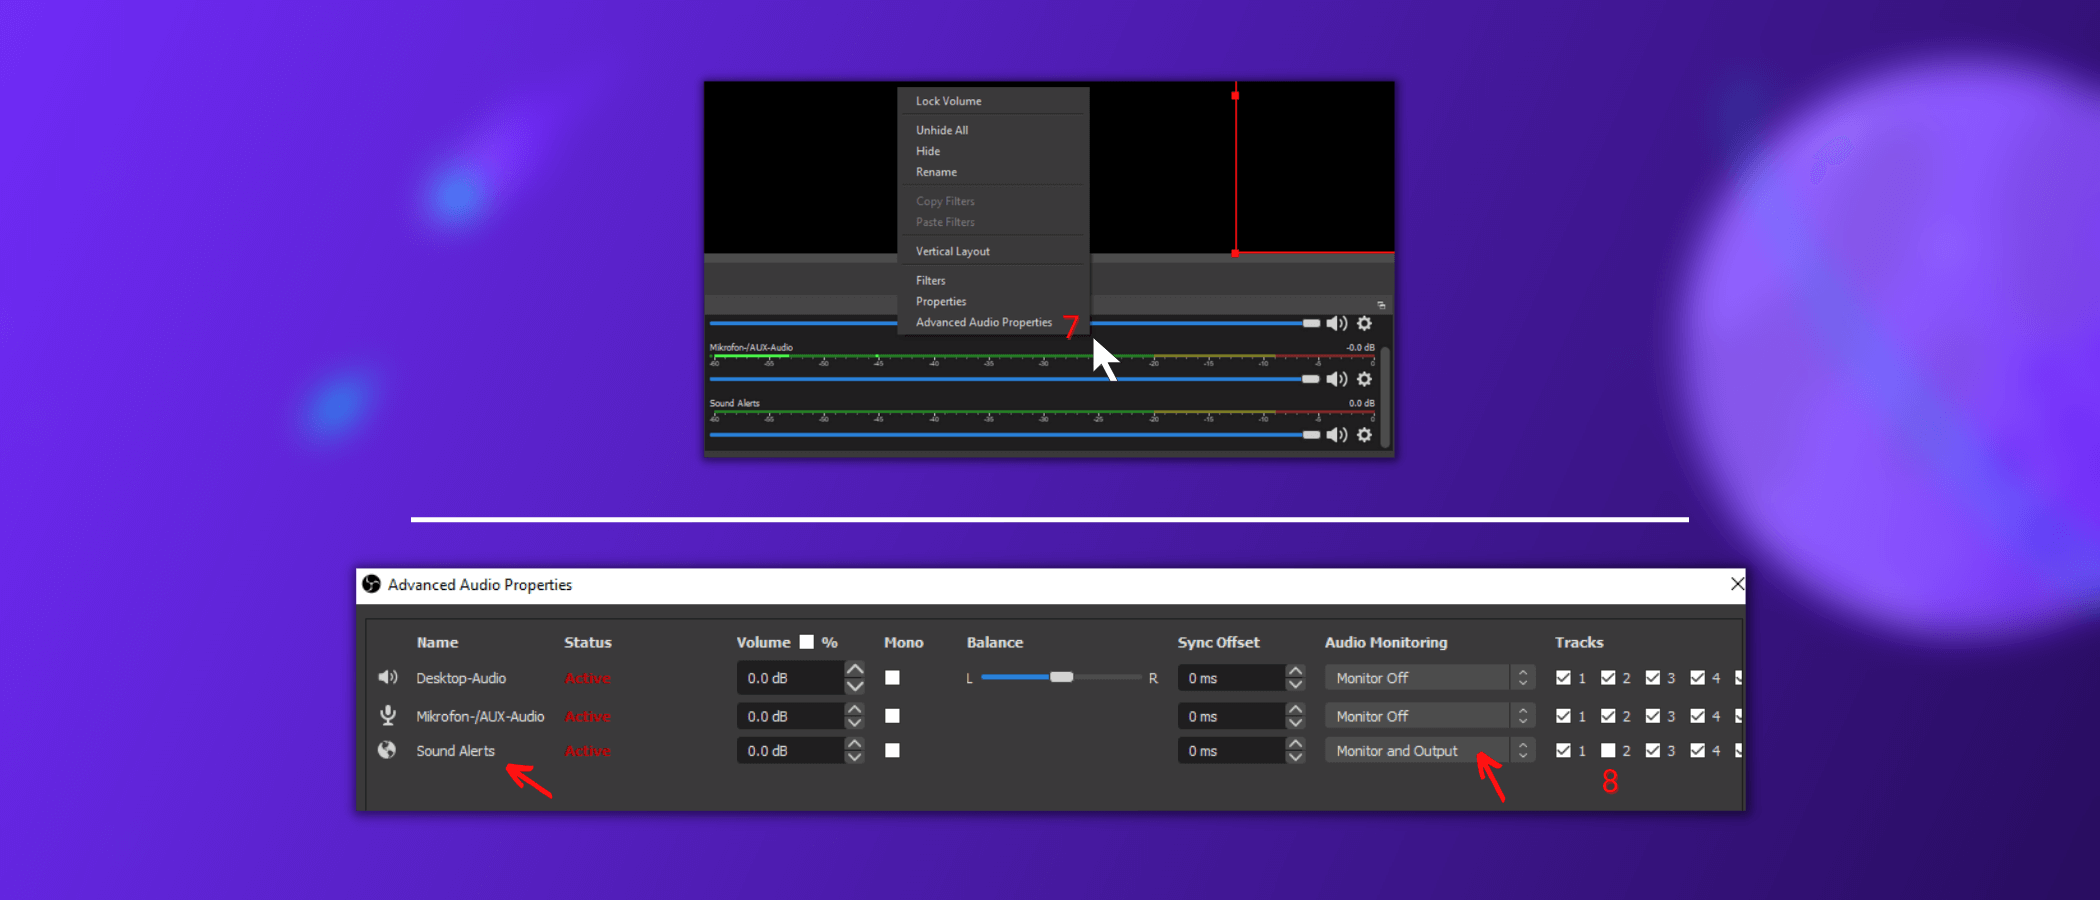
- (7) The window will close - now you perform a right-click on the "Audio Mixer" section in the bottom center and select "Advanced Audio Properties".
- (8) You want to disable the "Sound Alerts" audio source for the track you selected in step five. This way, it will not be included in your Twitch VOD upload. (Please note that your list of audio sources might differ from the listed ones in the screenshot as it depends on your streaming setup.)
- (9) Hit the "Close" button.
If you followed every step correctly, Sound Alerts will, from now on, be muted in your Twitch VODs.
Mute Sound Alerts in your Livestream Recordings using OBS
To successfully mute Sound Alerts in the recorded video files (local recordings), follow this step-by-step guide:
- (1) First of all, ensure that you are using the newest version of OBS: To do that, simply click on "Help" on the top and select the option "Check for Updates" in the dropdown menu.
- (2) Add the Sound Alerts browser source to OBS and ensure that the "Control Audio via OBS" option is selected in the browser source properties: We have a separate video guide for that process which you can find here. Ignore this step if your Sound Alerts browser source is already up and running.
- (3) Click on "File" on the top left and select "Settings".
- (4) In the "General" tab on the left, turn on the option "Automatically record when streaming" to ensure you always record your livestreams (optional).
- (5) Head over to the "Output" tab on the left and change your "Output Mode" to "Advanced" in the top center.
- (6) In the tab "Recording", turn on one of the audio tracks. We will choose number two in this example and recommend you do so, but please note that you can select a different number depending on your audio setup.
- (7) Select the "Apply" and the "OK" button in the bottom right.
- (8) The window will close - now you perform a right-click on the "Audio Mixer" section in the bottom center and select "Advanced Audio Properties".
- (9) You want to disable the "Sound Alerts" audio source for the track you selected in step six. This way, it will not be included in your VOD file. (Please note that your list of audio sources might differ from the listed ones in the screenshot as it depends on your streaming setup.)
- (10) Hit the "Close" button.

By following this guide correctly, you have successfully muted Sound Alerts in your livestream recording of OBS.
Mute Sound Alerts in your Twitch VODs using Streamlabs Desktop (SLOBS)
In this part of the guide, we will showcase how to mute Sound Alerts in your Twitch VODs with Streamlabs Desktop:
- First of all, ensure that you are using the newest version of Streamlabs Desktop with this download.
- (1) Add the Sound Alerts browser source to Streamlabs Desktop and ensure that the "Control Audio via Streamlabs Desktop" option is selected in the browser source properties: We have a separate guide for that process which you can find here. Ignore this step if your Sound Alerts browser source is already up and running.
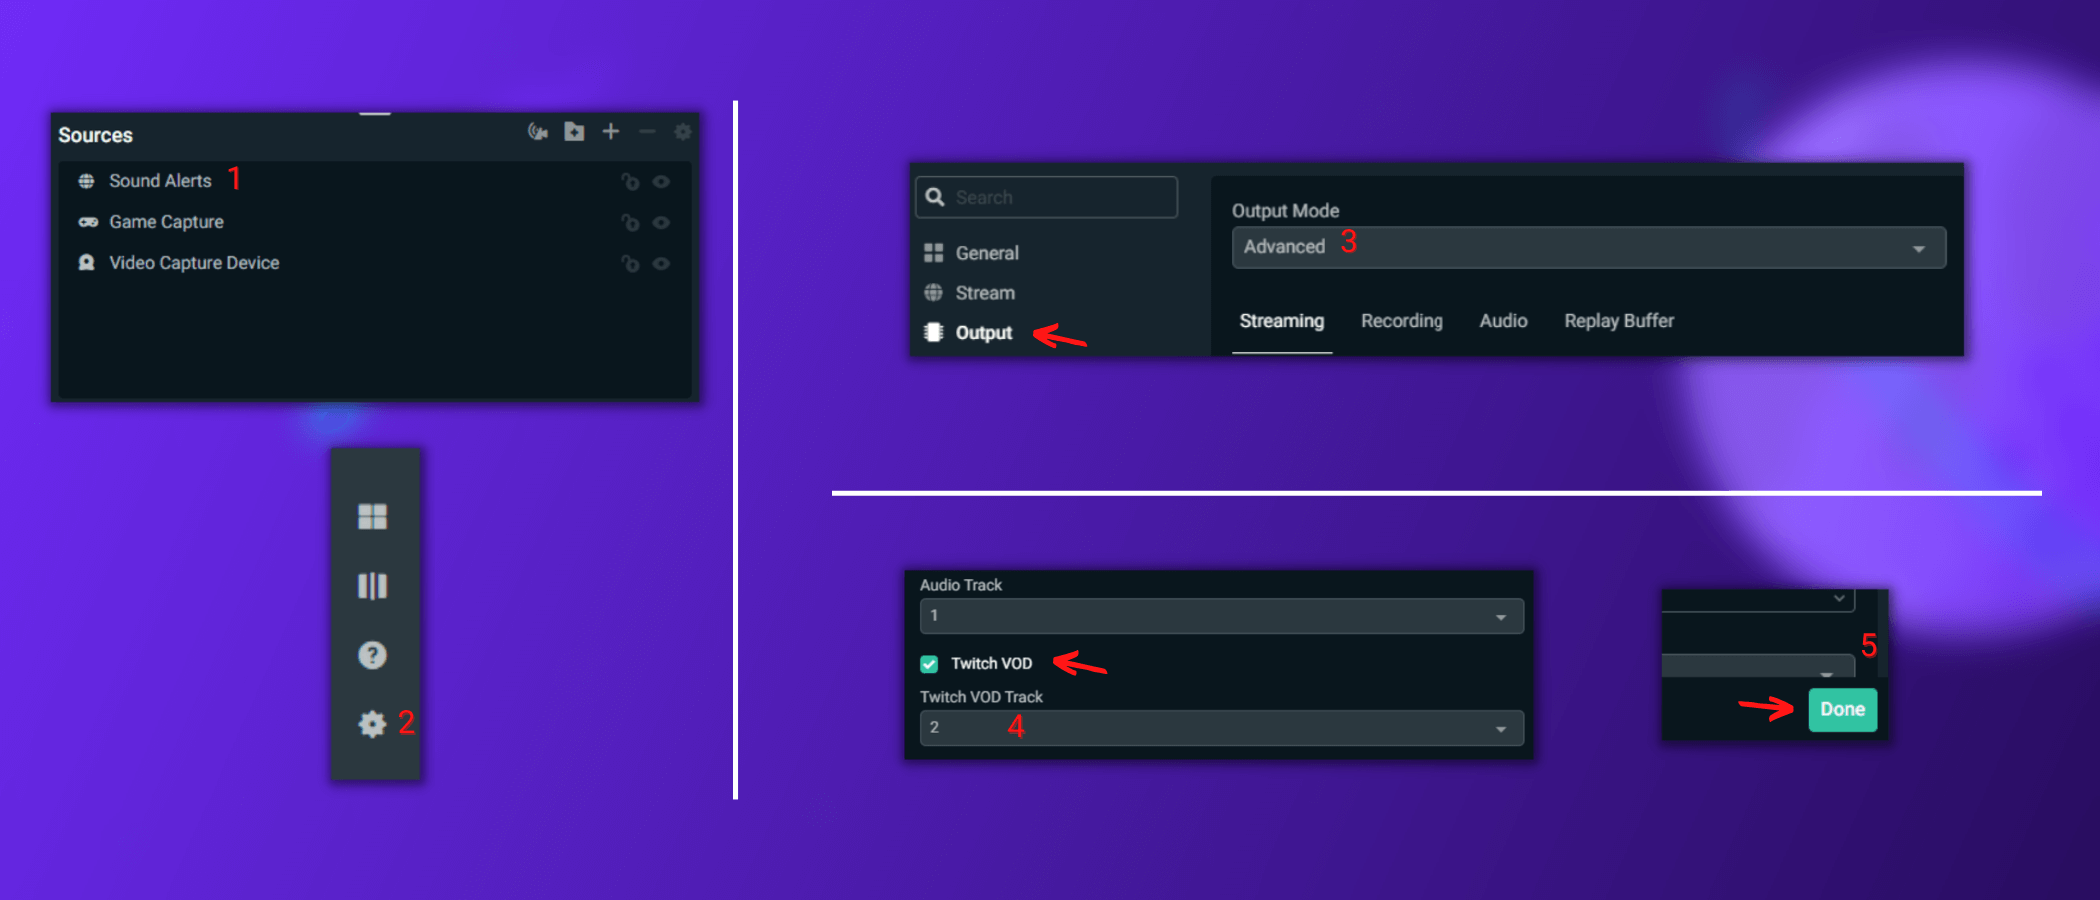
- (2) Click on the cogwheel on the bottom left and select "Output".
- (3) Change your "Output Mode" to "Advanced" in the top center.
- (4) Enable the "Twitch VOD" option and select an Audio Track. We will choose number two in this example and recommend you do so, but please note that you can choose a different number depending on your audio setup.
- (5) Click on the "Done" button in the bottom right.
- (6) Click on the cogwheel on the top right of the "Mixer" section.
- (7) You want to disable the "Sound Alerts" audio source for the track you selected in step four. This way, it will not be included in your Twitch VOD upload. (Please note that your list of audio sources might differ from the listed ones in the screenshot as it depends on your streaming setup.)

These were all the necessary steps to mute Sound Alerts in your Twitch VODs with Streamlabs Desktop.
Mute Sound Alerts in your Livestream Recordings using Streamlabs Desktop (SLOBS)
Muting Sound Alerts in your recording video files can be done with ease and just needs some tweaks in the Streamlabs Desktop settings:
- First of all, ensure that you are using the newest version of Streamlabs Desktop with this download.
- (1) Add the Sound Alerts browser source to Streamlabs Desktop and ensure that the "Control Audio via Streamlabs Desktop" option is selected in the browser source properties: We have a separate guide for that process which you can find here. Ignore this step if your Sound Alerts browser source is already up and running.
- (2) Click on the cogwheel on the bottom left.
- (3) In the "General" tab on the left, turn on the option "Automatically record when streaming" to ensure you always record your livestreams (optional).
- (4) Head over to the "Output" tab on the left and change your "Output Mode" to "Advanced" in the top center.

- (5) In the tab "Recording", turn on one of the audio tracks. We will choose number two in this example and recommend you do so, but please note that you can select a different number depending on your audio setup.
- (6) Click on the "Done" button in the bottom right.
- (7) Click on the cogwheel on the top right of the "Mixer" section.
- (8) You want to disable the "Sound Alerts" audio source for the track you selected in step five. This way, it will not be included in your Twitch VOD upload. (Please note that your list of audio sources might differ from the listed ones in the screenshot as it depends on your streaming setup.)

Following steps one to eight, you successfully muted Sound Alerts in your Livestream Recordings of Streamlabs Desktop.
And that's it
Make sure to request new features in our Sound Alerts ideas board to improve the application with your thoughts.
Thank you for using our Sound Alerts - we will keep you posted about new features, and updates on the Sound Alerts socials and this blog. Until then - happy streaming!